Rapid Hardware Prototyping - Turbocharge your process with PELA blocks
Have you ever wanted to get your hands dirty and dive right into a hardware project? Chances are you’ve considered 3D printing to get the job done and realized this requires a lot of time spent on modelling. How about decimating the time between testing prototypes by utilizing 3D printing, together with off the shelf building blocks.
In a hurry? scroll to the end to see a cool video instead 👇
We have quite a few people at Futurice who love tinkering and contributing to open source projects, so it was no big surprise that when some of our more hardware affine people wanted in on the action once they got wind of a self-driving car platform (http://www.donkeycar.com/). There’s only so much fun assembling a pre-made kit though, so driven by the need for speed, we decided to spice things up by making a 1:10 scale GT-24 VW Scirocco brushless drift car drive itself.
 Our real-life inspiration (Photo by Basilex)
 The actual car size
Before beginning with the machine learning part of making a self-driving car, you need to prepare the hardware platform. In this instance that involves attaching a Raspberry Pi for recording data and running the deep learning model, a wide-angle lens camera for it to see the track, and a servo control board for driving the motors. Starting with the electronics, integrations began with removing the RC receiver, and wiring everything up to the car so that it could be steered using the Raspberry Pi. Next, it was time to tackle the mechanical hardware.
Lean hardware prototyping: Using a fast and reliable building method
The building process itself normally takes long periods of measuring, estimating, designing the prototype then waiting hours for large 3D models to finish printing. This is in addition to testing, iterating to avoid interference with moving parts, and breaking things by running into the wall at high speed. Take the camera mount, for example: there are very few straight surfaces on the car and some no-go zones that need to be kept clear for moving and hot mechanical parts. You also don’t know in advance some details like the optimal camera angle for the machine learning. This needs to be tested later on… That would mean you have to take time to design a complicated fitting just to reprint everything again later on. In our case, even the idea of using the handyman’s secret weapon (duct tape), was discarded early on since it might get caught in the wheels or driveshaft.
We realized that we needed a prototyping technique with the following features:
- Compatibility
- All of the benefits of writing modular software also apply for hardware, making things fit together allows for quicker iterations and expandability
- Ease of use
- Modifications can be made during any given test phase, without the need of bringing in a HW specialist and wait times
- Flexibility
- Once something is working, it can be added to without starting over
- Reproducibility
- Projects like these are right in line with our open-source-friendly, sharing philosophy, therefore it shouldn’t just be easy to do, but also easy to explain
Luckily for us though, one of our tech gurus (Paul) likes tough problems and has been working on a parametric approach to generating functional 3D models for practical maker use such as Raspberry Pi and Arduino enclosures. The benefit of this approach is that the models are compatible with self-locking blocks such as Mega Bloks® and Lego®. This solves compatibility, so next up: ease of use.
 PELA Blocks come in many different sizes
The first challenge was to attach self-locking blocks to the frame of our car. This was our first chance to leverage the coolest feature of PELA Blocks: parametric generation. We printed 4x22 PELA blocks (which were not available in stores) and bolted them on. These make the most of the space available by being custom fitted to the sides of the car. With this we now have a solid base - a hardware platform, if you will - that supports all sorts of creative self-locking block based structures, and is easy to use for all skill levels.
 One platform to build them all, one platform to bind them.
Third point: flexibility. With all the accelerating, swerving and (occasional) crashing going on, some parts need to take a lot of punishment. Here we found that using a Flexible PELA block made out of TPU works admirably. Since we have a large range of compatible parts, there is also flexibility in the process itself - features can be hacked on the fly from multiple smaller, generic parts for quick testing. You can always make a tailored, custom part later once the design is validated.
Finally, there is the reproducibility - can we make this same thing again? More complex building projects can be explained using anything from simple diagrams all the way up to step-by-step assembly guides. Depending on the amount of pieces used in construction, a few photos can already do the trick by showing the most essential features - especially in projects like this where exact placement is not critical for each and every component.
Implementation: Iterating towards flexible, reliable construction
Now that we have the hardware platform ready to go, it’s time to build fast and validate. The main focus in iterative prototyping is not to get hung up on details, but use whatever works and focus on moving forward: build, measure, learn.
First version: Basic brick walls
This was the initial implementation. It also failed the spectacularly. By using basic bricks on either side of the car and suspending the components in-between, we had the hardware ready to drive within about 15 minutes. This worked fine as long as we had plenty of space to drive around in. Unfortunately, while brick walls are easy to make, they are also quite easy to break.

Second version: Studless skeleton frame
Building a minimal frame by clipping together beams of various lengths took 2-3 times as long as the bricks because you have to plan and think a bit more. The resulting construction is more resilient to small movements such as driving-induced vibrations while still being flexible when exposed to incoming walls. Collisions now only result in the occasional part popping off so reassembly takes a few seconds. The previous version, on the other hand, would have almost required the full 15 minutes to fix.
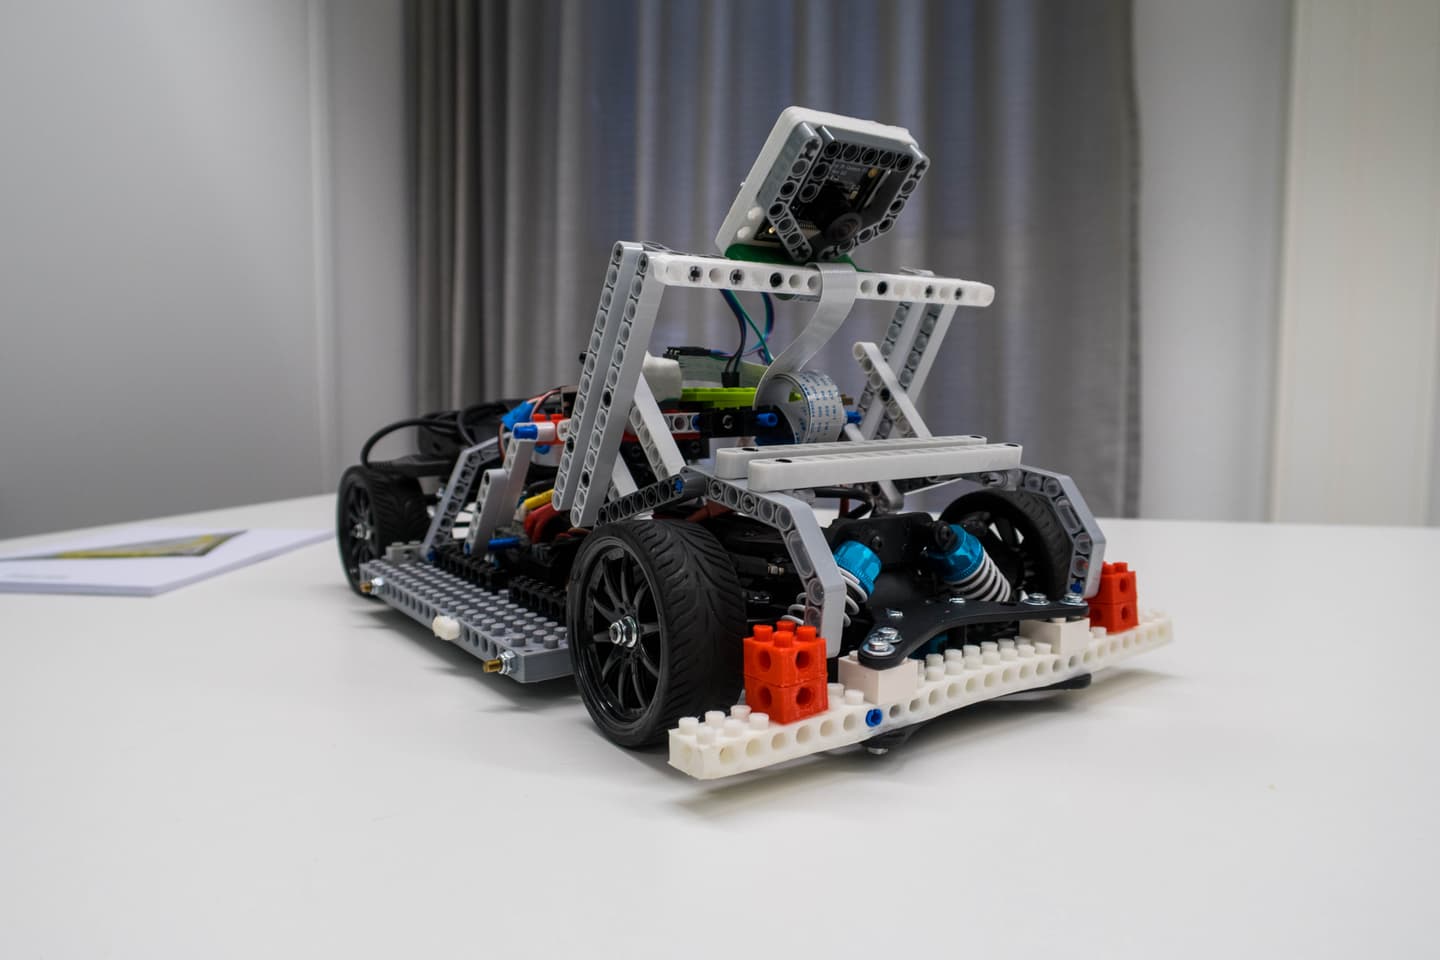
 Skeleton frame, v0.1.4
In the end, the most useful technique for this particular project is using beams and pin-connectors. This doesn’t always have to be the case though, as each type of block has its benefits. Simple bricks, for example, are very good at withstanding large amounts of static pressure. Both approaches deliver quick results early and support rapid iteration.
Here are also some more details on smaller fixes and further optimization that came up during testing:

- Print PELA calibration blocks to find the best fit with commercial blocks for your printer and material

- Place critical blocks adjacent to each other to prevent the beams from sliding apart under pressure

- Add flexible (TPU or Nylon) pins to reinforce connections that take a beating, such as the bumper

- Printing extended versions of basic parts can increase build strength
Final thoughts: Have we built a monster.. and how can you make one too?
First off, let’s address the elephant in the room - we’ve basically reinvented the wheel and created an alternative to the LEGO Mindstorms™ series. That isn’t necessarily a bad thing. While Mindstorms is a beginner-friendly platform to get started with, you quickly reach limitations due to the nature of using predetermined hardware and a sandbox coding environment which can only be worked around through extensive hacking. PELA Blocks, on the other hand, are firmly for Makers. These are great for working with any number of open platforms such as Raspberry Pi, Arduino, ESP32, and various derivatives that are all compatible with basic electronic tinkerer’s parts.
Embedded content: https://vimeo.com/317980605- If you’re keen on getting started with your own PELA blocks project then Paul occasionally uploads some of his generated designs for anyone to try out here: https://www.thingiverse.com/paulirotta/designs
- More advanced users can follow this how-to for generating their own custom parts using OpenSCAD: (pelablocks)
- Finally, the entire source code is available under the CC BY-SA 4.0 open source license and provided by Futurice in Github under LEGO-compatible-gadgets.
 Wilfried BockSenior Designer